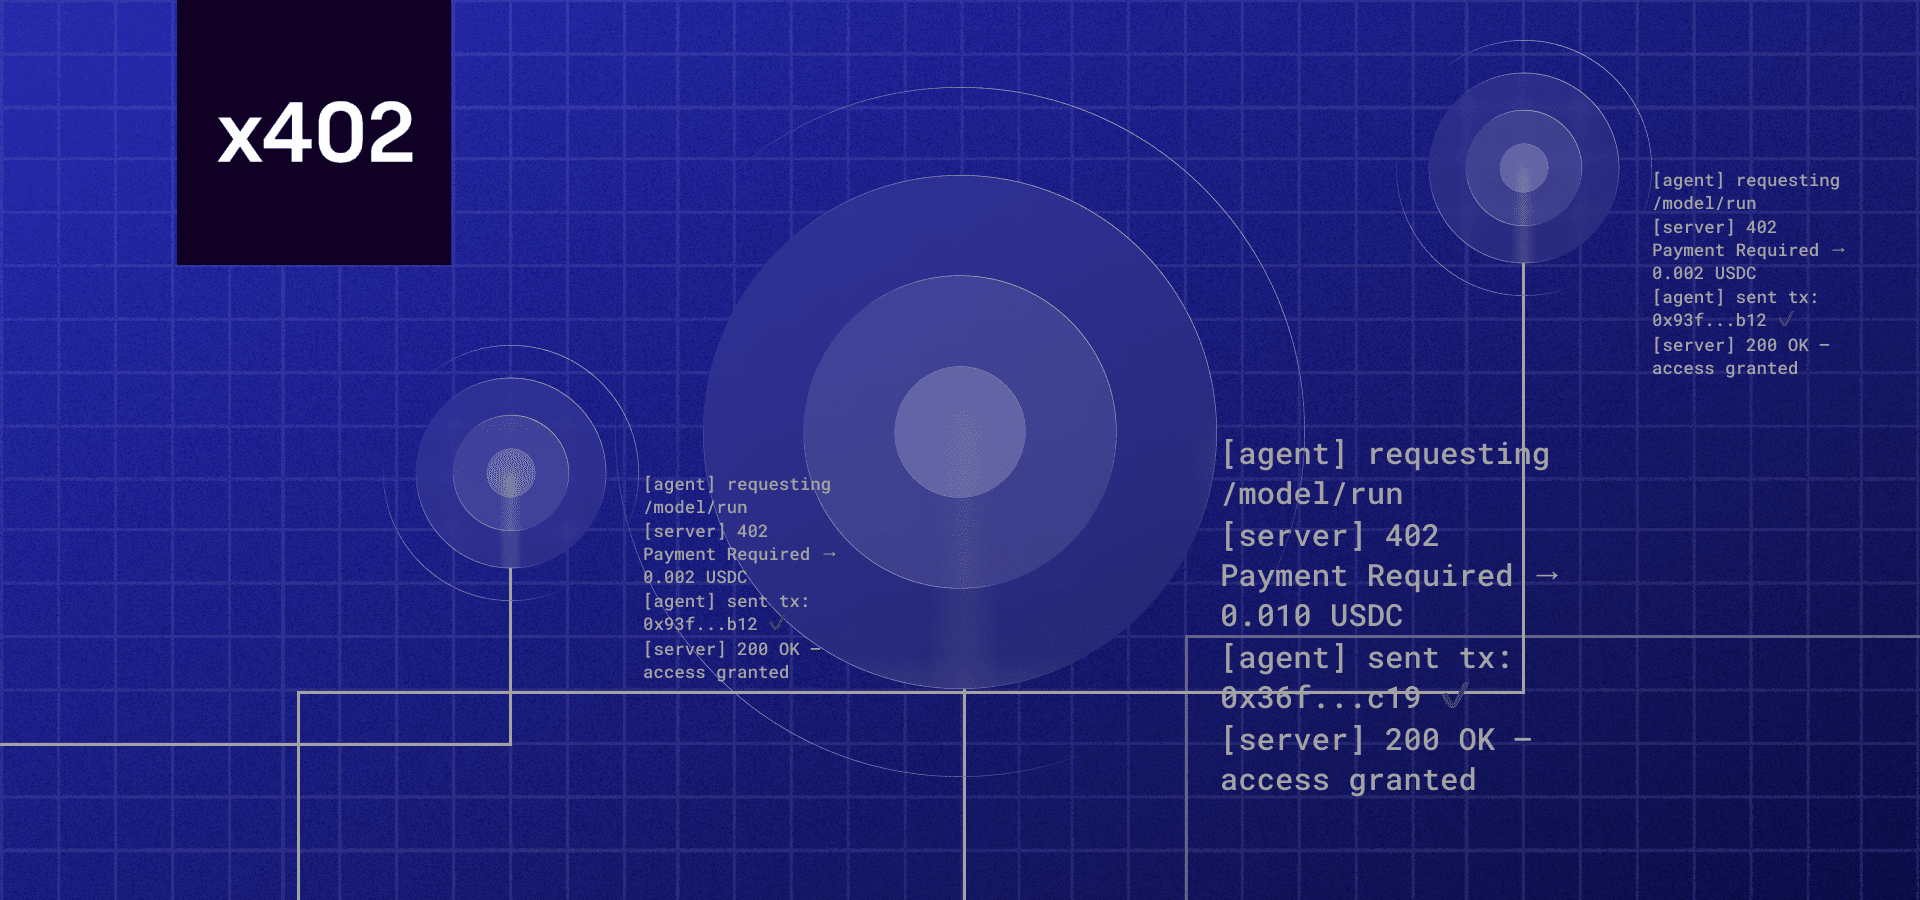
Why agents need paid metadata refreshes
AI agents are moving from passive observers to active participants in the NFT space, but they hit a hard wall when trying to fetch accurate data. Most marketplaces, including OpenSea, throttle or cache metadata aggressively to protect their infrastructure OpenSea Docs. For an agent trying to verify the authenticity, traits, or ownership history of an asset in real-time, this stale data is useless. It’s like trying to trade on a stock exchange with delayed quotes.
This creates a high-stakes gap. Agents require immediate, verified updates to execute trades or manage portfolios, but they cannot rely on public endpoints that are either rate-limited or outdated. Enter x402. By placing a small USDC payment at the API gate, you create a monetization layer that ensures agents are committed to the query. This isn’t just about revenue; it’s about access control.
The beauty of x402 is that it handles the payment logic transparently. Agents can automatically pay for these refreshes without manual intervention, creating a seamless loop of data-for-value. This model scales because it removes the friction of traditional payment processors while providing a clear, auditable record of who is paying for what data.
Setting up the x402 payment gate
Creating a monetization layer for your NFT metadata requires more than just a smart contract; it demands a reliable bridge between on-chain payments and off-chain API responses. The x402 facilitator provides this bridge, allowing you to accept USDC payments directly from API consumers. This setup transforms your endpoint from a public resource into a gated service, ensuring that every metadata refresh is backed by a verified transaction.
Before writing code, understand the value proposition. Micro-payments for metadata updates are most effective when the asset's value fluctuates or when real-time accuracy is critical. To contextualize this, here is the live USDC/USD chart, showing the stability that makes stablecoins ideal for transactional APIs.
The following steps outline the integration process using the Coinbase Developer Platform (CDP) facilitator. This is the official, recommended path for sellers building payment-gated APIs.

Begin by installing the @coinbase-x402/facilitator-sdk in your project. This library handles the complex logic of validating x402 headers and verifying on-chain settlements. It abstracts away the need to manually parse transaction hashes or query blockchain state for every request.
Set up your environment variables with your Facilitator API key and your receiver wallet address. The facilitator acts as the middleman, receiving the payment proof from the client and confirming it against the blockchain before your API returns the metadata. Ensure your receiver address is pre-funded with minimal gas if your chain requires it for any internal operations.
Wrap your metadata refresh endpoint with a middleware function that intercepts incoming requests. Check for the presence of a valid x-payments header. If the header is missing or malformed, return a 402 Payment Required status immediately. This prevents unauthorized access and ensures that only clients willing to pay can trigger the refresh logic.
Once the header is present, use the Facilitator SDK to validate the payment proof. The SDK will verify that the USDC transfer has been confirmed on-chain and that the amount matches your specified price. If validation passes, proceed with the metadata refresh; if it fails, log the attempt for security monitoring and reject the request.
Upon successful validation, fetch the latest metadata from your data source and return it to the client in the standard JSON format. Include any relevant timestamp or block number in the response to prove the freshness of the data. This completes the cycle, delivering value in exchange for payment.
The final cost of your service should reflect the computational resources required for the refresh. Use a live price widget to monitor USDC stability, ensuring your pricing model remains consistent even during market volatility.
Integrating the metadata refresh logic
Once the x402 signature is validated and the payment is secured, the final step is triggering the metadata refresh. This is where the blockchain state meets the marketplace display. If you skip this step, your buyers pay for an asset that still looks broken or outdated on OpenSea or Alchemy.
The process is straightforward but unforgiving. You are making a direct API call to update the cached metadata. Because this action modifies public-facing data, it must only happen after the payment gateway confirms the transaction. A premature call could lead to metadata updates for unpaid items, or worse, expose your endpoint to abuse.
We will walk through the specific API calls for the two largest platforms: OpenSea and Alchemy. Both require a POST request with specific headers and payload structures. The key difference lies in how they handle the authentication and the specific endpoint URLs.
Step 1: Verify the x402 Payment
Before making any external API calls, your server must validate the x402 signature attached to the request. This ensures that the user has actually paid the required fee (in USDC or ETH) to trigger the refresh. Never trust the client-side request blindly.
Use the verifyPayment logic from your x402 implementation to check the signature against the blockchain. If the verification fails, return a 402 Payment Required error immediately. This is your first line of defense against unauthorized metadata updates.
const isValid = await verifyX402Signature(request.headers['x-x402-signature']);
if (!isValid) {
  return new Response('Invalid payment signature', { status: 402 });
}
Step 2: Trigger the OpenSea Metadata Refresh
OpenSea provides a dedicated endpoint for this purpose. You need to send a POST request to https://api.opensea.io/api/v1/refresh_metadata with the NFT's contract address and token ID.
Include your API key in the X-API-KEY header. OpenSea will then queue a job to fetch the latest metadata from the blockchain and update their cache. This process is asynchronous, so you won't get an immediate update in the response, but the change should reflect on the listing within minutes.
const response = await fetch('https://api.opensea.io/api/v1/refresh_metadata', {
  method: 'POST',
  headers: {
    'X-API-KEY': process.env.OPENSEA_API_KEY,
    'Content-Type': 'application/json'
  },
  body: JSON.stringify({
    contract_address: contractAddress,
    token_id: tokenId
  })
});
Step 3: Trigger the Alchemy Metadata Refresh
Alchemy offers a similar endpoint, but it is specific to their NFT API v3. The URL is https://nft.api.alchemy.com/v2/refresh-metadata.
Like OpenSea, you need to authenticate with your API key and provide the contract address and token ID. Alchemy's refresh endpoint is particularly robust for Ethereum mainnet, ensuring that the metadata aligns perfectly with the smart contract's current state.
const alchemyResponse = await fetch('https://nft.api.alchemy.com/v2/refresh-metadata', {
  method: 'POST',
  headers: {
    'Authorization': `Bearer ${process.env.ALCHEMY_API_KEY}`,
    'Content-Type': 'application/json'
  },
  body: JSON.stringify({
    contractAddress: contractAddress,
    tokenId: tokenId
  })
});
Step 4: Handle the Response and Notify the User
After sending the request, check the response status. A 200 OK or 202 Accepted status indicates that the refresh job has been queued. If you receive an error, log it and inform the user that the metadata update might take a few minutes to propagate.
Finally, send a confirmation back to the client. This closes the loop for the x402 flow, letting the user know that their payment not only secured the asset but also triggered the necessary technical updates to make it visible and accurate.
Handling rate limits and conflicts
When you are running an x402 endpoint to refresh NFT metadata, you are essentially running a payment-gated service. The stakes are high: if your API calls fail because of network congestion or conflicting updates, you lose revenue and damage user trust. You need to treat these operational risks like a high-frequency trading desk, not a casual script.
Managing 409 Conflicts
A 409 Conflict error usually means someone else updated the NFT metadata between your last check and your current refresh request. This is common with popular collections where owners frequently update images or attributes.
Don't just retry immediately. Implement a backoff strategy. Wait a few seconds, then check the current state before retrying. This prevents you from spamming the API and wasting USDC on redundant calls. Think of it like waiting for a door to open; if it's already being opened by someone else, you pause and let them finish.
Dealing with Rate Limits
API providers like Alchemy and OpenSea enforce strict rate limits to keep their infrastructure stable. If you hit these limits, your requests will be throttled or rejected. This is a critical point for any entrepreneur scaling their service.
Monitor your response headers for rate limit information. Implement a queue system that batches requests when possible. This ensures you stay within limits while still keeping your metadata fresh. If you ignore this, your service will grind to a halt during peak times.
Failed Transactions
Sometimes, the blockchain itself is the bottleneck. If a transaction fails, you need to know why immediately. Was it a gas issue? A network congestion problem? Or a simple input error?
Log every failure with its specific error code. This data is gold for debugging. It helps you distinguish between temporary network hiccups and permanent configuration errors. Don't let failed transactions go unnoticed; they are direct leaks in your monetization pipeline.
Pricing your metadata refresh service
When you open an x402 endpoint for AI agents to fetch NFT metadata, you are essentially selling access to real-time data. The stakes are high: if you price too low, bots will drain your resources; if you price too high, legitimate developers will bypass your service entirely. The goal is to find the sweet spot where your API remains profitable without becoming a bottleneck for the agents that rely on it.
There are two primary ways to structure these payments: per-call microtransactions or subscription-based access. A per-call model works well for sporadic queries, charging fractions of a cent for each metadata fetch. In contrast, a subscription model offers predictable revenue and limits the frequency of calls for a flat monthly fee. Choosing between them depends on your expected traffic volume and how you want to manage bot behavior.
| Feature | Per-Call Microtransaction | Subscription Model |
|---|---|---|
| Revenue Predictability | Low (depends on volume) | High (fixed monthly fee) |
| Bot Protection | Direct cost per request | Rate limits & access control |
| Developer Friction | High (requires wallet setup) | Low (one-time payment) |
| Best For | Sporadic, high-value queries | High-volume, routine checks |
For most developers starting with x402, the per-call model is easier to implement but requires careful monitoring of USDC transaction fees. Since these payments happen on-chain, gas costs can eat into your margins if the per-call fee is too small. You might consider using a PriceWidget to track current USDC valuations to ensure your pricing remains viable as market conditions shift.
Ultimately, your pricing strategy should reflect the value of the metadata. If your service provides verified, up-to-the-second NFT traits that other sources lack, you can command a premium. Start with a modest per-call rate, monitor your agent interactions, and adjust as you learn how developers use your data.
Deploying and monitoring the endpoint
Getting your x402 endpoint live is the moment the code meets the market. Because this is a payment-gated API, the stakes are high: a single configuration error can block legitimate buyers or leave you open to unpaid access. Treat deployment like a launch, not an afterthought.
Before touching mainnet, verify signature validation and metadata refresh logic on a test network. Use the CDP quickstart for sellers to ensure your payment routing works correctly without risking real funds.
Set up alerts for failed transactions. In the x402 model, a dropped payment means lost revenue and a frustrated user. Track success rates in real-time to catch network congestion or signature validation errors before they scale.
Since you are accepting USDC, keep an eye on the stablecoin's peg. Use a live price widget to monitor USDC stability alongside your API traffic. Sudden de-pegging events can complicate revenue recognition and user trust.

Payment-gated APIs require 99.9% reliability. If your endpoint goes down, you stop earning. Implement health checks and automated restarts to ensure your metadata refresh service is always available for buyers and AI agents.
No comments yet. Be the first to share your thoughts!